'Beyond Truth' particle tutorial #2
Introduction:
I could go through all the particles that are in my game, however most of them are using same techniques, so I'm thinking about making the most important particles that are base to others. The one I'm going to make right now is fairly simple, however it adds a really cool touch to my game. It's that one:
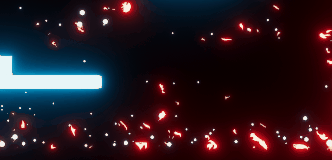
What I mean is our player 'explosion'. You may also wonder how I did this trail that goes to spawn point. Well, we made that in previous tutorial, as it's the effect of trail that follows our character ;)
So what I wanted to achieve was a square that crashes into smaller parts. Also as you can see there are thin trails that represent 'joints' that connected that square (my imagination).
Setting shape and basic concept:
 '
'
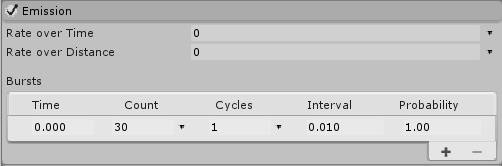
Our emission module will be different this time. We want our particles to spawn all at once, not through time, so we set Rate over Time to 0 and we add Burst.
Burst is exactly what we want to achieve, it spawns 'Count' of particles with specified 'Interval'. That means it will spawn 30 particles and then wait the time we set. As I'm spawning these particles just once I didn't have to change interval at all.
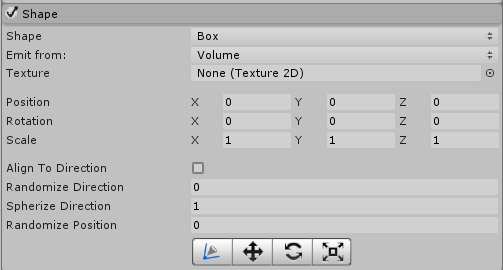
For our shape we want to set our player. So I set it to Box (I could do rectangle, but while it's in 3D it already looks better). If your player is bigger than mine you can just scale your shape till it's same as player.
Material:
For our material I use exactly same material as in previous tutorial. So just drag it here:

Shining part is already done then :)
Personalization:
Now it's time to set our properties the way we enjoy them. I did it like that:
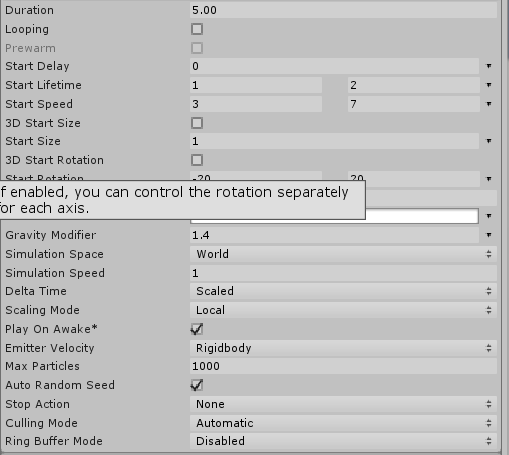
What I wanted to achieve was a range of variety. In Unity you can achieve that by clicking that little arrow on right side of property.
Then you can set range of how something will spawn. I used that for StartLifetime to make particles disappear not all at once. StartSpeed to make all the particles fly with different speed and StartRotation so that at the beginning they are already rotated by some degree.
Also I played a lot with GravityModifier to achieve the fall that felt immersive for me.
Size:
Here I did exactly same thing as in previous tutorial. To fade our particles I just made their size decrease over time.
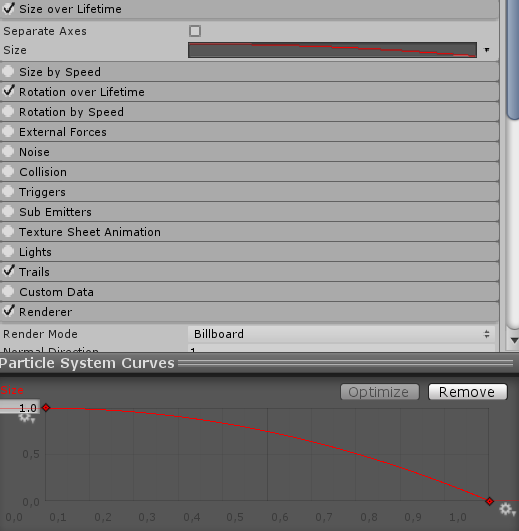
Rotation:
We already set a StartRotation that makes particles rotate when their spawn, however we also want them to rotate while they live.

And once again we use that arrow to set Range. All the values are chosen to match my effect, you can play with them :)
Trails:
Last but not least, there are our little trails that remove some stiffness from our particles.
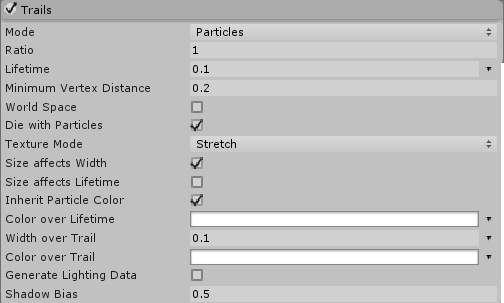
This time we set them just to Particles and play with:
Lifetime - it describes how long trail will be (mine is really short so it's 0.1)
Minimum Vertex Distance - it's about roundness of our trail. In my case it's really short and small so I left it as it's in a default settings (to make perfect round trail, set it to 0 )
Width over Trail - just width of trail
And that's how I got it ;)
Hope it's going to be useful somehow. As you can see, a lot of particles are based on each other and we usually do them in a very similiar way.
Have a great time!
Leave a comment
Log in with itch.io to leave a comment.